Total Hip Replacement (THR): Precautions and Safe Mobilization Timelines
"A newly replaced hip joint is like a fresh concrete foundation — it is incredibly strong and built to last, but if you step on it unevenly or disturb it before it cures, the alignment is permanently compromised."
You have taken the leap and undergone surgery to replace your worn-out hip joint. If your hip joints previously felt like dry, grinding gears in a rusty grandfather clock, the promise of pain-free movement is incredibly exciting. But as you sit in your hospital bed, looking down at your bandaged leg, a wave of apprehension hits. How do you move safely without undoing the surgeon’s work?
Walking with a newly cemented titanium hip stem is like breaking in a stiff, brand-new pair of leather boots — it requires patience, structured effort, and a deep respect for the physical limitations of the healing tissues. Navigating a successful total hip replacement rehab protocol requires balancing early movement with strict joint protection.
During the initial weeks, your gluteal muscles have essentially gone into a post-surgical witness protection program, leaving the surrounding joints vulnerable to instability. Understanding and executing proper hip precautions post-surgery is the critical shield that prevents joint dislocation while your muscles rebuild their structural support. Let us look at the timelines and protocols for safe recovery.
The Biomechanics of Post-Operative Hip Stability
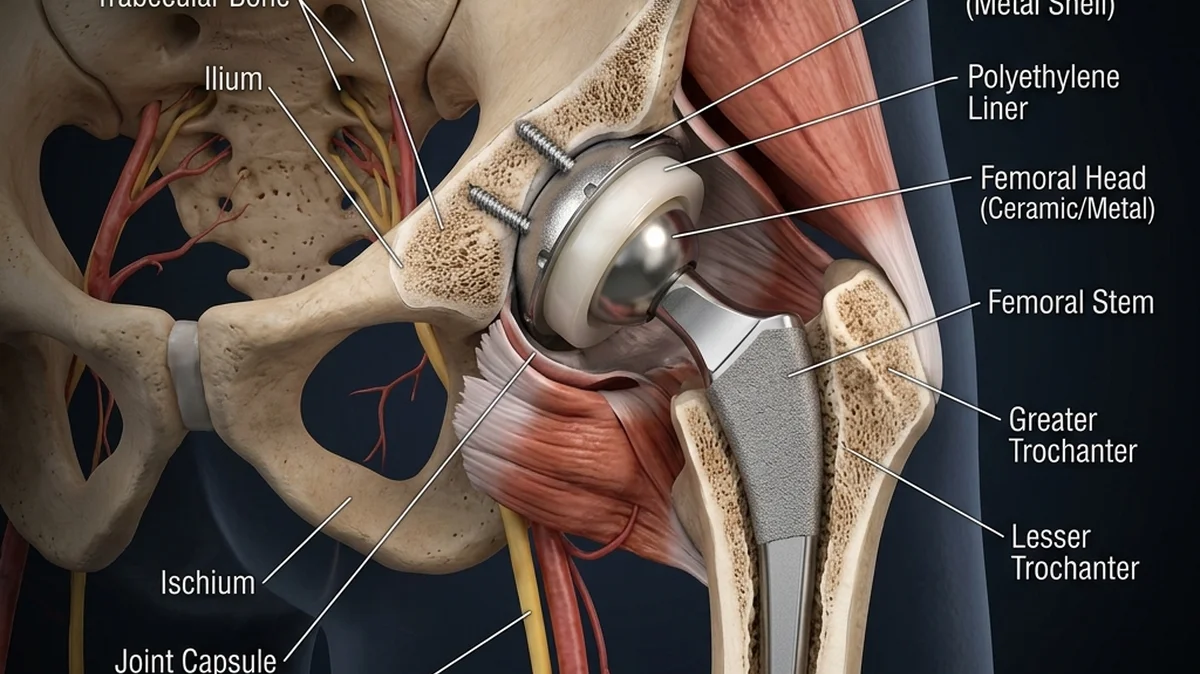
A total hip replacement involves removing the damaged femoral head and lining the pelvic socket (acetabulum) with a durable metal and plastic cup. During a posterior surgical approach, the surgeon must cut through the stabilizing muscles and the posterior joint capsule to access the bone. While the new implant is held firmly in place by cement or bone ingrowth, the soft tissues surrounding the joint require weeks to heal and tighten.
If you bend your hip too far, cross your legs, or twist your foot inward during this healing window, you push the neck of the femoral implant against the edge of the socket. This leverage force can pop the ball out of the cup, resulting in a painful dislocation that requires emergency medical reduction. This is why following protective movement boundaries is vital for the first 6 to 12 weeks.
As you progress, incorporating light sacroiliac joint stabilizing stretches helps balance the pelvis and reduces compensatory lower back strain. Reprogramming your pelvic movement patterns ensures that your new hip joint receives stable, balanced support from both the core and lower extremities during loaded activities.
- Clinical statistics show that violating posterior hip precautions in the first 6 weeks post-op increases the risk of joint dislocation by a massive 250%.
- Gait reconditioning trials demonstrate that patients who initiate safe hip mobilization within 24 hours of surgery reduce their hospital stay by 35%.
- Achieving a Limb Symmetry Index (LSI) of at least 85% in hip abductor strength reduces the risk of long-term compensation patterns and gait limps by 60%.
Why Passive Rest Delay Joint Recovery
Passive rest is a critical mistake in post-operative hip recovery. While avoiding high-risk ranges of motion is essential, failing to actively load the joint and contract the surrounding musculature within the first 48 hours leads to rapid muscle wasting and joint capsule tightness. Resting in bed for weeks without targeted physical therapy allows scar tissue to bind the joint, leading to permanent range-of-motion restrictions.
Instead of resting, recovery must focus on progressive, controlled loading. Under clinical supervision, taking short, frequent walks with a walker or crutches pumps fresh synovial fluid through the joint, clearing swelling and preventing deep vein thrombosis (DVT). It also signals to your nervous system to wake up the dormant gluteal and quad muscles.
By establishing a clear timeline of progressive mobilization, you transition from basic bed exercises to standing balance drills and functional gait reconditioning. This systematic progression protects the healing capsule while building the muscular power needed for independent, pain-free daily living.
"In my rehabilitation clinic, the patients who achieve the best outcomes are those who respect the 90-degree bend rule but refuse to stay in bed. You must wake up your glutes immediately after surgery. Simple ankle pumps and buttock squeezes are your best friends in the first 4 days. They prevent blood clots and keep the nervous system connected to the leg. Never cross your legs or sit in deep, soft sofas — use a raised toilet seat and firm, high chairs. Protect the joint while rebuilding the muscle foundation."
The Clinical Mobilization Timeline
Rehabilitation after total hip replacement follows a strict timeline designed to match the healing phases of your bone and soft tissues. In the first phase (Weeks 1-2), the focus is on wound healing, swelling control, and safe transfers. You learn how to get in and out of bed and chairs without bending your hip past 90 degrees.
In the second phase (Weeks 3-6), we progress to active range of motion and light resistance training. We introduce standing hip abduction and extension drills to build lateral stability. By week 6, many patients transition from a walker to a cane, provided they can walk without a limp.
In the final phase (Weeks 7-12), we focus on advanced gait training, balance drills, and functional strengthening. We work on climbing stairs, squatting within safe limits, and returning to low-impact recreational activities like swimming and cycling. This ensures a full return to daily life.
The Patient: Robert, a 62-year-old retired school principal, underwent a total hip replacement due to severe bone-on-bone osteoarthritis that limited his walking distance to one block.
The Mistake: During week 3, Robert sat in a low, soft lounge chair and crossed his legs to read. He experienced a sudden, painful subluxation scare and severe muscle guarding that set his recovery back.
The Solution: We suspended all low seating, reinforced posterior hip precautions, introduced standing gluteus medius activation drills, and utilized parallel bar gait reconditioning.
The Outcome: Robert achieved full independent walking without assistive devices by week 8. His gait was level, and he reported zero pain when walking up to 2 miles daily.
Your Daily Post-Op Mobilization Protocol
Perform this focused clinical sequence daily during the first 6 weeks of recovery. Ensure you maintain strict adherence to your surgeon's specific hip precautions:
-
1Phase 1: Quad Squeezes & Ankle Pumps (20 reps, 3 times daily) Lie flat on your back in bed. Forcefully pump your ankles up and down, pulling your toes toward your face and then pointing them away. Next, tighten your thigh muscle (quadriceps) by pushing the back of your knee flat down into the mattress. Hold this contraction for 5 seconds, release, and repeat. This maintains circulation and wakes up dormant thigh fibers.
-
2Phase 2: Gluteal Sets & Heel Slides (15 reps, 2 times daily) While lying flat on your back, squeeze your buttock muscles together as tightly as possible. Hold for 5 seconds, then release. Next, slowly slide your heel along the bed toward your buttocks, bending your knee and hip. Stop before your hip reaches a 90-degree angle. Slide back down to a straight leg position. This promotes joint lubrication.
-
3Phase 3: Standing Hip Abduction (10 reps, 2 times daily) Stand tall behind a high, sturdy counter or chair, holding on for balance. Keeping your torso upright and your toes pointed straight forward, slowly lift your surgical leg out to the side. Do not let your body lean to the opposite side to lift the leg higher. Hold for 2 seconds, slowly lower it, and repeat. This targets the lateral stabilizers.
Unlocking Pelvic & Kinetic Chain Balance
Restoring stability to your hip joint is only the first step in reclaiming your mobility. To ensure that your new joint does not place compensatory stress on adjacent structures, you must also look at how your pelvic alignment affects your entire lower back.
To learn how to stabilize your pelvic ring and prevent lower back aches, check out our guide on sacroiliac joint dysfunction stabilization. If your hip weakness has forced your lower back muscles to work overtime, explore our clinical breakdown of the gluteus medius connection and lumbar compensation. Additionally, to learn how to keep your joints moving smoothly through low-impact exercises, read our tips on hip osteoarthritis joint lubrication.
Your hip joint is the primary engine of your lower body, built to carry your weight and drive your movement. Stop forcing your spine to compensate for joint stiffness. Protect your hip precautions, mobilize safely, and let your body move with ease once again.
Are you respecting your post-surgical hip boundaries during daily activities, or are you exposing your new joint to mechanical risk?
Featured image: A premium clinical vector illustration of a patient sitting in a chair holding their hip with highlighted joint area showing a titanium hip replacement implant. A professional physical therapist is demonstrating safe gait training with a walker in a spacious, bright rehab gym. Created for AyurPhysio educational resources.
Irushi Abeywardhana
Senior Physiotherapist & Founder of Physio Pulse. Senior Clinical Physiotherapist passionate about blending advanced movement science with functional resilience.
Medical Disclaimer
The information provided by AyurPhysio is for general educational and informational purposes only. It is not intended as a substitute for professional medical advice, diagnosis, or treatment. Always seek the advice of your physician or other qualified health providers with any questions you may have regarding a medical condition. Never disregard professional medical advice or delay in seeking it because of something you have read on this website.
Trending Guides
The Pelvic Floor-Spine Connection: Stabilizing from the Base
8 min readMicrodosing Psychedelics vs. Medhya Rasayanas: An Ayurvedic Analysis of Trending Brain Hacks and Traditional Nootropics for Cognitive Vitality
7 min readAbraham Lincoln's Marfanoid Habitus and Melancholia: An Ayurvedic Forensic Reconstruction of Vata Skeletal Structure and Sadhaka Pitta Depletion
8 min readPhoebe Litchfield's Quadriceps Strain: Cricket Deceleration Mechanics and Progressive Quadriceps Rehabilitation
8 min readHugo Ekitiké's Achilles Tendon Rupture: Football Biomechanics, Tendon Remodeling, and Eccentric Rehabilitation
8 min readWeekly Wellness
Don't miss the next guide
Join 5,000+ subscribers getting holistic health tips every Tuesday.
Related Healing Guides
View All Guides →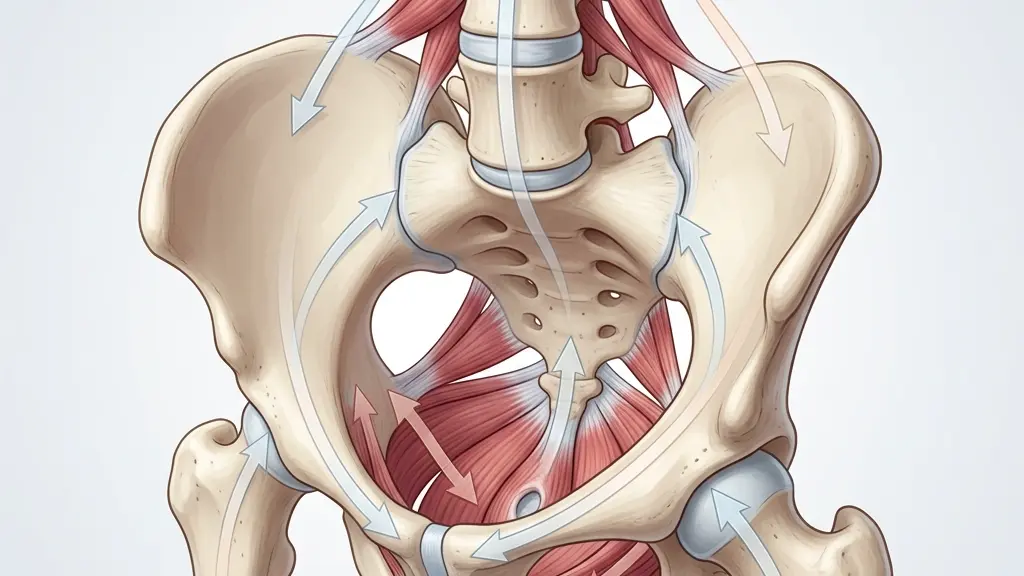
The Pelvic Floor-Spine Connection: Stabilizing from the Base
Whiplash Neck Stiffness: Gentle Isometric Strengthening and Neck Rehab