"When you injure your high ankle ligaments, the mechanical collar holding your two leg bones together is compromised. Every step you take spreads the bones apart, acting like a wedge driven into a split log—widening the gap and preventing healing."
For football fans worldwide, the sight of NFL star Patrick Mahomes limping off the field during a playoff game, only to return and lead his team to victory, is an iconic sports memory. The diagnosis—a high ankle sprain—is feared by athletes in all sports. This injury is notorious for sideline times that double or triple those of standard lateral sprains.
Rushing back to play without mechanical stability is a major gamble. Running and cutting when your high ankle joint is loose places extreme shear forces on the ankle talus bone. This can lead to chronic instability, early arthritis, and permanent cartilage damage.
To safely execute a successful high ankle sprain recovery, you must understand the unique anatomy of the syndesmosis. This guide details the mechanics of the injury and presents progressive sports ankle syndesmosis rehabilitation exercises.
The Syndesmosis: The Lower Leg's Structural Collar
The lower leg consists of two bones: the larger tibia (shin bone) and the smaller fibula on the outside. These bones are held tightly together by a fibrous network called the syndesmosis, which includes the anterior inferior tibiofibular ligament (AITFL) and the interosseous membrane. This collar keeps the ankle joint stable when your foot bears weight.
A high ankle sprain occurs when the foot is planted and rotated forcefully outward (external rotation) while the leg is flexed forward. This motion drives the talus bone upward and outward like a wedge, tearing the syndesmotic ligaments. The tibia and fibula begin to separate, destabilizing the ankle mortise joint.
Clinical sports data indicates that high ankle sprains represent up to 15% of all athletic ankle sprains, with recovery times taking up to 6 to 8 weeks. If the joint widening (diastasis) exceeds 2 millimeters under stress, surgical stabilization using a "tightrope" implant is required. Re-establishing joint stability is essential before introducing lateral movements.
Biomechanical testing shows how syndesmosis widening alters ankle joint force distribution:
- 1Syndesmosis SeparationA widening of just 1.5 millimeters reduces the contact area of the ankle joint by 40%, spiking local pressure.
- 2Separation ForceSprinting and cutting force the tibia and fibula apart with a force up to 3 times your body weight.
- 3Recovery Timeline GapThe average recovery time for a high ankle sprain is 45 days, compared to just 15 days for a standard lateral sprain.
- 4Functional Power ReturnAthletes require at least 90% Limb Symmetry Index (LSI) in single-leg hop tests before returning to contact sports.
The Clinical Opinion: Stop Early Unprotected Weight-Bearing
"I see many players who try to play through a high ankle sprain by simply applying heavy tape. While taping reduces the rotation, it does not stop the shin bones from spreading apart under weight. My clinical opinion is that early weight-bearing without a rigid boot or a carbon-fiber plate insert delays healing by continuously widening the syndesmosis. You must protect the joint first before trying to rebuild strength."
The 3-Phase Syndesmosis Rehab Protocol
To rehabilitate a high ankle sprain, progress from joint immobilization to progressive axial loading and dynamic stability drills.
Phase 1: Protected Compression and Swelling Reduction
To allow the torn ligaments to heal, the tibia and fibula must be compressed. The ankle is immobilized in a walking boot to block external rotation, and a compression wrap is applied to prevent swelling from separating the bones. Avoid any active movement that turns the foot outward. Continue this protection for 2 to 3 weeks depending on the grade.
Phase 2: Progressive Axial Loading (Calf Raises)
Once pain-free during quiet standing, introduce straight-line axial load to rebuild calf strength. Stand facing a wall. Slowly rise onto the balls of both feet, hold for 2 seconds, and lower down. Avoid any twisting of the foot. Perform 3 sets of 15 repetitions daily, gradually shifting more weight onto the injured leg as tolerated.
Phase 3: Dynamic Landing and Proprioception
To prepare the ankle for cutting forces, perform single-leg balance drills. Stand on one leg on a soft foam mat or balance board, keeping your hip and knee aligned. Hold this position for 30 seconds. Progress to gentle, straight-line hopping, focusing on soft landings without allowing the ankle to roll inward or outward. Perform 3 sets daily.
Maintaining Long-Term Ankle Performance
Rebuilding ankle stability requires consistent care. To protect your joints from future sprains, focus on calf flexibility and avoid wearing worn-out athletic shoes during heavy field training. It is also important to strengthen your hip stabilizers, such as the gluteus medius, as proximal hip weakness directly increases the lateral shear forces transmitted down to the ankle joint during running and landing.
In addition, athletes should incorporate dynamic proprioceptive training into their warm-up routine, even after returning to full play. Spending just 5 minutes balancing on a single leg or performing multi-directional hop drills before practice can significantly reduce the risk of re-injury. Remember that ligaments can take up to a full year to remodel completely, meaning joint protection remains a priority long after the pain has resolved.
For complementary lower body conditioning guides, read our clinical guide on ankle sprain rehab and our guide on shin splints rehabilitation. To learn how posterior chain loading protects the ankle, see our article on Achilles tendon recovery to balance your joint mechanics.
Featured image display: Left: Professional portrait of Patrick Mahomes. Right: High-resolution clinical illustration of the ankle syndesmosis ligament complex. Composite prepared for AyurPhysio clinical reference.
Dr. Dhanushika Dilshani
Expert Ayurvedic Wellness Doctor. Specialized in modern holistic wellness, optimizing dermal resilience, cosmetic radiance, and systematic diagnosis driven by traditional and evidence-based medical logic.
Medical Disclaimer
The information provided by AyurPhysio is for general educational and informational purposes only. It is not intended as a substitute for professional medical advice, diagnosis, or treatment. Always seek the advice of your physician or other qualified health providers with any questions you may have regarding a medical condition. Never disregard professional medical advice or delay in seeking it because of something you have read on this website.
Trending Guides
George Washington's Fatal Bloodletting: An Ayurvedic Reconstruction of Rakta Dhatu Depletion and Ojas Collapse
8 min readJack Grealish's stress fracture of the foot: Soccer Biomechanics, Fifth Metatarsal Load, and Surgical Rehab
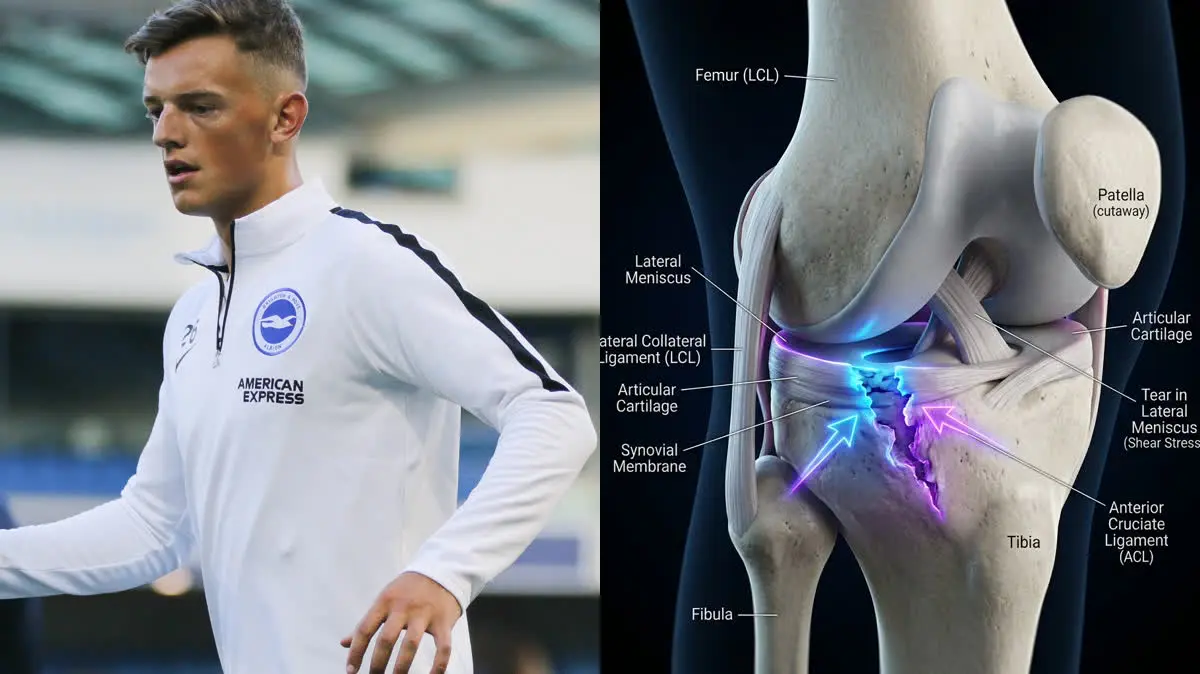
8 min readBen White's Severe Knee Injury: A Biomechanical Analysis of Lateral Meniscus Shear and Joint Longevity
8 min readElly De La Cruz's Hamstring Strain: The Biomechanics of Sprint Deceleration
8 min readTotal Knee Replacement (TKR): Post-Op Protocols for Restoring Extension
9 min readWeekly Wellness
Don't miss the next guide
Join 5,000+ subscribers getting holistic health tips every Tuesday.
Related Healing Guides
View All Guides →
George Washington's Fatal Bloodletting: An Ayurvedic Reconstruction of Rakta Dhatu Depletion and Ojas Collapse
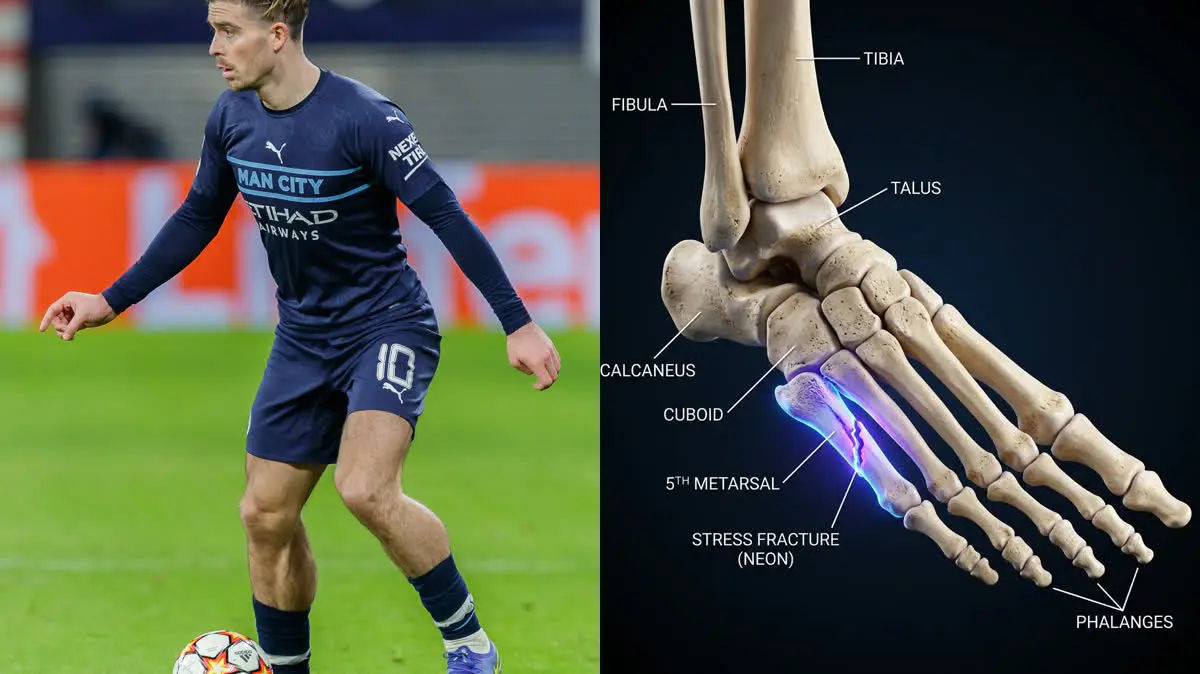
Jack Grealish's stress fracture of the foot: Soccer Biomechanics, Fifth Metatarsal Load, and Surgical Rehab